
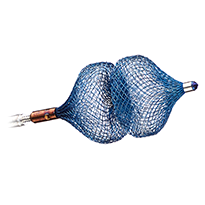
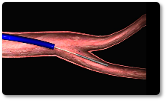
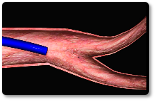
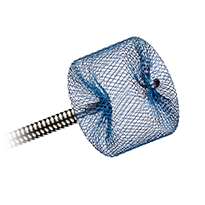
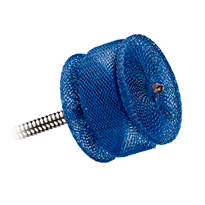
Amplatzer™ Vascular Plug 4
(AVP 4)
Deployment
Note: This section should not be used in place of the Instructions for Use. This section only provides an overview of the procedure. Refer to the Instructions for Use for additional information.1
Access the vessel and perform an angiogram using standard technique to measure the diameter of the vessel at the desired occlusion site.
Select a vascular plug with a diameter approximately 30-50% larger than the vessel diameter at the occlusion site. Ensure that the occlusion site has sufficient length so the deployed device length will not obstruct other vessels or anatomical structures.
Deployment Steps
| Deployment Steps | |
|---|---|
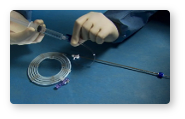
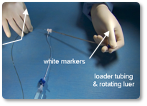
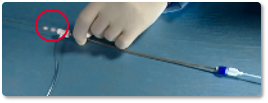
| 1 | a) Flush with sterile saline through the stop cock until fluid exits the distal tip to purge air from the loader. NOTE: If the AVP 4 is inadvertently deployed before use, follow these additional steps prior to use: b) grasp the spring-loaded tapered loader tubing and the rotating luer in one hand and retract the delivery wire with the other hand. c) Continue to retract the delivery wire until both the single white marker and the double white markers on the delivery wire are visible. Make sure the device is fully retracted into the loader. d) Reflush the device if necessary. |
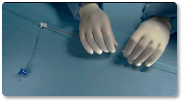
| 2 | Remove device (in loader) and delivery wire from the hoop dispenser. |
| 3 | Select a delivery catheter with an internal diameter that will accommodate the selected device. The original access catheter may be used if the internal diameter is sufficient for the selected device. Prepare the catheter for use (according to the manufacturer’s instructions for use). |
| 4 | Advance the delivery catheter over the guidewire until the distal tip of the catheter is at the distal edge of the occlusion site (according to the manufacturer’s instructions for use). |
| 5 | Remove the guidewire. |
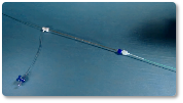
| 6 | Insert the tapered tip of the loader into the hub of the 0.038 inch guidewire compatible diagnostic catheter. NOTE: Do not connect the luer through a stopcock, hemostasis valve, Y-connector or other valve. This will result in damage to the loader. |
| 7 | Grasp the rotating luer and press the luer to the hub of the catheter and rotate clockwise to ensure full engagement of the loader to the catheter hub. |
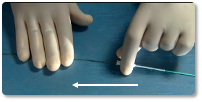
| 8 | Advance the delivery wire until the double white marker is as the hemostasis valve. |
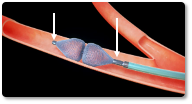
| 9 | Hold delivery wire in place and slowly retract the delivery catheter to deploy the device at the occlusion site. |
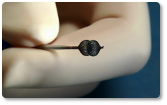
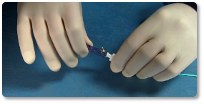
| 10 | Verify position of the device using the radiopaque marker bands. ~ If unsatisfactory, stabilize the wire and re-advance the delivery catheter until the device is completely within the catheter. Reposition and deploy, or remove the device from the patient. ~ If satisfactory, attach the plastic vise to the wire and rotate the delivery wire counterclockwise until it separates from the device. |
| 11 | Remove delivery catheter and wire from the patient. |
Steps 1-2

Steps 3-5
Steps 6-8
Steps 9-11
References
- Amplatzer™ Vascular Plug 4 – Instructions for Use
MAT-2002814 v1.0
AMPLATZER™ Vascular Plug 4

Indications And Usage: The AMPLATZER™ Vascular Plug 4 is indicated for arterial and venous embolizations in the peripheral vasculature.
Contraindications: None known.
Warnings:
- The safety and effectiveness of this device for cardiac uses (eg, cardiac septal occlusion, patent ductus arteriosus, paravalvular leak closures) and neurologic uses have not been established.
- Do not use this device if the sterile package is open or damaged.
- Use on or before the last day of the expiration month that is printed on the product packaging label.
- The device was sterilized with ethylene oxide and is for single use only. Do not reuse or resterilize this device. Attempts to resterilize this device can cause a malfunction, insufficient sterilization, or harm to the patient.
- Do not use a power injection syringe to inject contrast solution through this device.
- Physicians must be prepared to deal with urgent situations, such as device embolization, which require removal of the device. This includes the availability of an on-site surgeon.
Precautions:
- The AMPLATZER™ Vascular Plug 4 device consists of a nickel-titanium alloy, which is generally considered safe. However, in vitro testing has demonstrated that nickel is released from this device for a minimum of 60 days. Patients who are allergic to nickel may have an allergic reaction to this device, especially those with a history of metal allergies. Certain allergic reactions can be serious; patients should be instructed to notify their physicians immediately if they suspect they are experiencing an allergic reaction such as difficulty breathing or inflammation of the face or throat. Some patients may also develop an allergy to nickel if this device is implanted.
- The physician should exercise clinical judgment in situations that involve the use of anticoagulants or antiplatelet drugs before, during, and/or after use of the device.
- Store in a dry place.
- This device should be used only by physicians who are trained in standard endovascular techniques. The physician should determine which patients are candidates for procedures that use this device.
- Use in specific populations
- Pregnancy - care should be taken to minimize the radiation exposure to the
fetus and the mother. - Nursing mothers - there has been no quantitative assessment of the presence
of leachables in breast milk.
- Pregnancy - care should be taken to minimize the radiation exposure to the
MRI Safety Information:
| Device Name | Amplatzer™ Vascular Plug 4 |
| Static Magnetic Field Strength (B0) | 1.5 T or 3.0 T |
| Maximum Field Spatial Gradient | 19T/m (1900 gauss/cm) |
| RF Excitation | Circularly Polarized (CP) |
| RF Transmit Coil Type | Body Coil |
| Operating Mode | Normal Operating Mode |
| Maximum Whole Body SAR | 2.0W/kg (Normal Operating Mode) |
| Maximum Head SAR | N/A |
| Scan Duration | 2.0W/kg whole-body-averaged SAR for 15 minutes of continuous scanning |
| MR Image Artifact | The presence of this implant may produce an image artifact. |
Potential Adverse Events: Potential adverse events that may occur during or after a procedure placing this device include, but are not limited to:
- Air embolus
- Allergic reaction/toxic effects
- Bleeding
- Death
- Device migration
- Fever
- Foreign material embolic event
- Hemolysis
- Infection
- Occlusion of unintended vessel
- Peripheral embolism
- Recanalization
- Residual flow
- Stroke/TIA
- Surgical intervention
- Vascular access site complication
- Vessel trauma/perforation
State of California (USA) Only:
WARNING: This product can expose you to chemicals including ethylene oxide, which is known to the State of California to cause cancer and birth defects or other reproductive harm. For more information, go to www.P65Warnings.ca.gov.
MAT-2004318 v4.0