
Manage your device ID Card
Keep your ID card information updated so you can always get the best care possible when you need it.
Ensure you have the setup guide instructions specific to your Transmitter model. You should have received these with your Merlin@home Transmitter, or you can search for them on our manuals site.
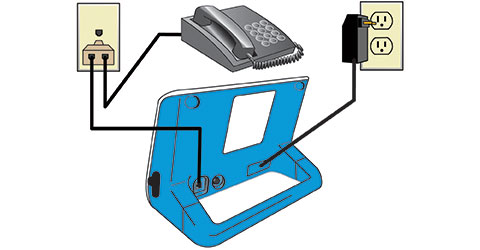
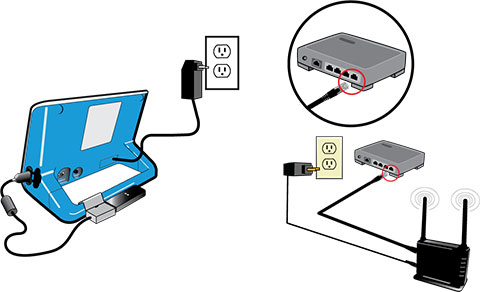
There are several ways you can connect your Merlin@home Transmitter to your doctor or clinic. When first setting up your Transmitter, you can choose to connect it via a direct analog telephone line, a cellular adapter, or a wireless broadband kit (connects using your home Wi-Fi).
Choose whichever connection method allows for a reliable connection based upon your circumstances.
Place your Merlin@home Transmitter on a table or nightstand within 10 feet of your bed and follow the instructions specific to the connection method you choose: direct analog telephone line, cellular adapter, or wireless broadband kit (Wi-Fi).
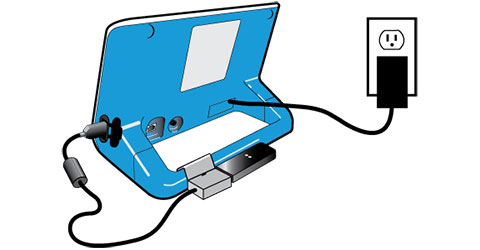
Plug the transmitter power supply into the wall electrical outlet. The green power light comes on. Keep the transmitter plugged in. While the Transmitter is booting up, the progress lights move from left to right. Sometimes this process takes a while.
Note: If the green power light does not come on, contact Abbott Remote Care Technical Support (see contact information below).
After the Transmitter boots up, the Read icon will light up, the progress lights will blink, and beeping will start.
Make sure you are within 1 foot of the Transmitter. Make sure no one else with an Abbott implantable cardiac device is nearby. Face the Transmitter and quickly press and release the Start button. The Transmitter will beep.
The Read icon lights up when the Transmitter reads your implant. It will stop flashing but remains lit while the Transmitter reads your device and the progress lights move left to right. Stay close to the Transmitter.
The Tower icon lights up when the transmitter is attempting to connect with your doctor or clinic. This process may take several minutes. Depending on your connectivity this can be between 5 to 15 minutes. If the Transmitter is connecting via a direct analog telephone line, do not use the landline during this process.
When the Stars icon lights up, your set up is finished. The Stars icon remains lit for a short time. Leave the Transmitter in place and plugged in.
NOTE: During first time set up, the Transmitter does not send information about your implant.
Model EX1150 and EX1150W
Model EX1100

MAT-2116991 v2.0

