
Multiple Device Deployment
Perclose ProGlide™ Suture Mediated Closure (SMC) System Instructions for Use (IFU). Refer to IFU for additional information.
Pre-Close Technique
- Pre-close technique means the Perclose ProGlide™ suture is placed around the arteriotomy at the beginning of the procedure and knot advancement is placed on hold until the procedure is complete
- For arterial sheath sizes greater than 8F or venous sheath sizes greater than 14F, at least two devices and the pre-close technique are required
Pre-Deployment
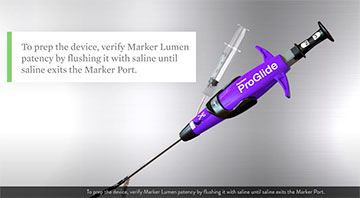
- Flush Marker Lumen
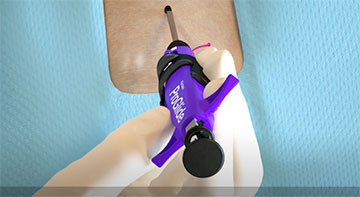
- Insert the first of two devices over the guide wire
- Remove guide wire when Guide Wire Exit Port is at skin level
- Advance device until pulsatile flow is observed from Marker Lumen. In the vein, blood may only fill the Marker Lumen
- Rotate the device 30° toward the patient's right side
Suture Deployment
1a. Lift Lever to open Foot. Do NOT open Foot before rotating device 30°
1b. Retract device against anterior wall of vessel until marking has stopped
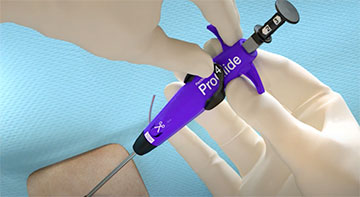
2. Stabilize device at 45º while maintaining gentle retraction against the vessel wall. Depress the plunger to deploy the needles.
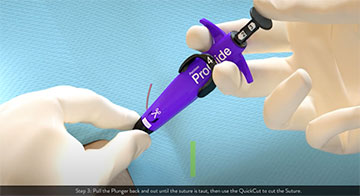
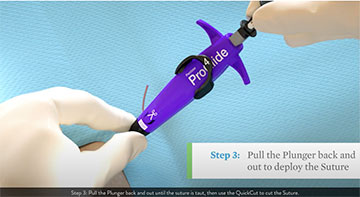
3. Remove Plunger using the thumb as a fulcrum. Pull suture taught. Cut suture with QuickCut or scissors
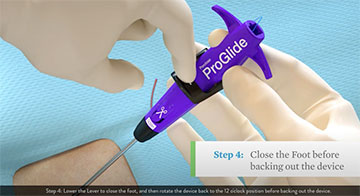
4. Relax device and return Lever down to its original position
Suture Management
- Retract device until Guide Wire Exit Port is at skin level
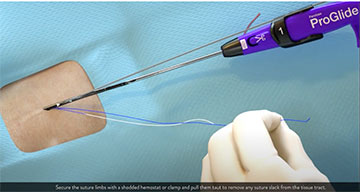
- Remove the sutures and hold sutures tightly together
- Blue limb = Rail
- White limb = Non-Rail
- Place a hemostat or clamp to hold the two sutures together at the distal end of the Non-Rail (white)
- Pull on clamp until the suture is taut. Place clamped suture on patient's right side under sterile towel
- Re-insert guide wire and remove device
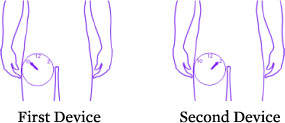
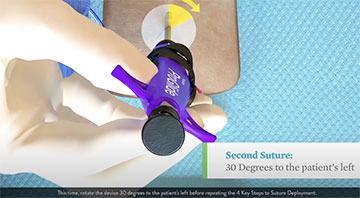
Second Device Deployment
- Repeat Pre-Deployment steps for each device
- Second Device
- Insert the device and rotate 30° toward the patient's left side and repeat deployment steps
- Repeat suture management steps and place clamped suture on patient's left side under sterile towel
- Knot advancement will be on hold until the end of procedure
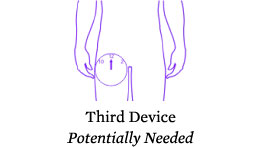
- Third device (optional as needed)
- Third device should not be rotated. Device will deploy in a straight position
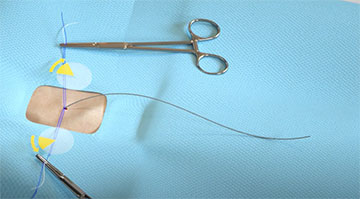
End-of-Procedure Suture Management
- At the end of the procedure, advance a guide wire into the vessel
- Remove clamp from first suture placed at patient's right side
NOTE: Hold manual compression during sheath system removal and initial suture advancement
- Wrap Rail (blue) around left forefinger and hold coaxial to tissue tract
- Remove sheath and pull Rail (blue) simultaneously and slowly to advance suture knot
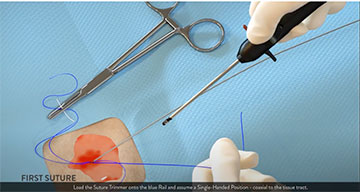
- Re-clamp and return the suture to the right side of the patient to identify the first sutures deployed
- Repeat steps above for suture set 2 and place on left side of patient. Repeat for suture set 3 if a third device was deployed
- Do not lock or excessively tighten the knot while the guide wire is in the vessel
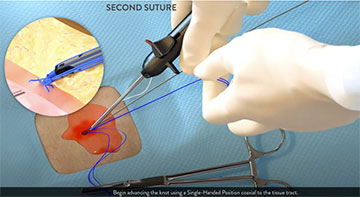
- Use Snared Knot Pusher (SKP) to complete knot advancement and to lock the knot
- The suture knots must be advanced in the order they were placed
- Load Snared Knot Pusher (SKP) on to Rail (blue) suture of the first suture set placed on patient's right side
- Advance Shared Knot Pusher (SKP) coaxial down to the vessel
- Pull on the Non-Rail (white) suture to lock the knot
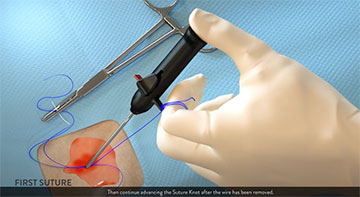
- Repeat steps for sutures placed on patient's left side
- Remove guide wire once bleeding is controlled
- Load Snared Knot Pusher (SKP) on to Rail (blue) suture patient's right side and lock knot by pulling on the Non-Rail (white) suture
- Repeat for sutures placed on the patient's left side
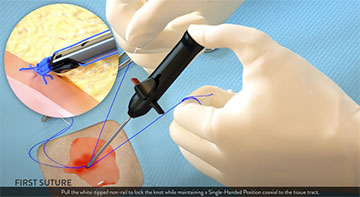
Assess Hemostasis
- Assess hemostasis after all knots are advanced and locked
- If adequate hemostasis is not observed, advance each knot again starting with the first suture deployed followed by the second suture deployed
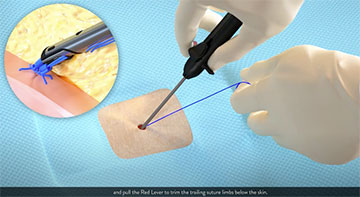
- Trim all sutures once adequate hemostasis is observed
MAT-2202618 v3.0
Perclose ProGlide™ Suture-Mediated Closure (SMC) System

Indications:
The Perclose ProGlide™ Suture-Mediated Closure System is indicated for the percutaneous delivery of suture for closing the common femoral artery and vein access site of patients who have undergone diagnostic or interventional catheterization procedures.
The Perclose ProGlide™ SMC System is indicated for closing the common femoral vein in single or multiple access sites per limb.
The Perclose ProGlide™ SMC System is used without or, if required, with adjunctive manual compression.
For access sites in the common femoral artery using 5F to 21F sheaths. For arterial sheath sizes greater than 8F, at least two devices and the pre-close technique are required.
For access sites in the common femoral vein using 5F to 24F sheaths. For venous sheath sizes greater than 14F, at least two devices and the pre-close technique are required.
Caution:
Federal law restricts this medical device to sale by or on the order of a physician (or allied healthcare professionals, authorized by, or under the direction of, such physicians) who is trained in diagnostic and / or interventional catheterization procedures and who has been trained by an authorized representative of Abbott.
Prior to use, the operator must review the Instructions for Use and be familiar with the deployment techniques associated with the use of this device.
During closure of access sites using a procedural sheath greater than 8F, it is recommended that a vascular surgeon or a surgeon with vascular training be available in case surgical conversion to control bleeding and to repair the vessel is needed.
Contraindications:
There are no known contraindications to the use of this device.
Warnings:
Do not use the Perclose ProGlide™ SMC System if the packaging or sterile barrier has been previously opened or damaged or if the components appear to be damaged or defective.
DO NOT RESTERILIZE OR REUSE. The Perclose ProGlide™ SMC System is intended for single use only.
Do not use the Perclose ProGlide™ SMC System if the sterile field has been broken where bacterial contamination of the sheath or surrounding tissues may have occurred, since such a broken sterile field may result in infection.
Do not use the Perclose ProGlide™ SMC System if the puncture site is located above the most inferior border of the inferior epigastric artery (IEA) and / or above the inguinal ligament based upon bony landmarks, since such a puncture site may result in a retroperitoneal hematoma. Perform a femoral angiogram to verify the location of the puncture site. Note: This may require both a right anterior oblique (RAO) and left anterior oblique (LAO) angiogram to adequately visualize where the sheath enters the femoral vessel.
Do not use the Perclose ProGlide™ SMC System in arterial or venous access if the puncture is through the posterior wall or if there are multiple punctures in the same access site, since such punctures may result in a hematoma or retroperitoneal bleed.
Do not use the Perclose ProGlide™ SMC System if the puncture site is located in the superficial femoral artery or the profunda femoris artery, or the bifurcation of these vessels, since such puncture sites may result in a pseudoaneurysm, intimal dissection, or an acute vessel closure (thrombosis of small artery lumen). Perform a femoral angiogram to verify the location of the puncture site. Note: This may require both a right anterior oblique (RAO) and left anterior oblique (LAO) angiogram to adequately visualize where the sheath enters the femoral vessel.
Precautions:
- Prior to use, inspect the Perclose ProGlide™ SMC System to ensure that the sterile packaging has not been damaged during shipment. Examine all components prior to use to verify proper function. Exercise care during device handling to reduce the possibility of accidental device breakage.
- As with all catheter-based procedures, infection is a possibility. Observe sterile technique at all times when using the Perclose ProGlide™ SMC System. Employ appropriate groin management, as per hospital protocol, post procedure and post hospital discharge to prevent infection.
- Use a single wall puncture technique. Do not puncture the posterior wall of the vessel in arterial and venous access.
- Do not deploy the Perclose ProGlide™ Device at an elevated angle against resistance as this may cause a cuff miss or device breakage.
- There are no reaccess restrictions if previous arteriotomy / venotomy repairs were achieved with Abbott Medical SMC or SMCR systems.
- If significant blood flow is present around the Perclose ProGlide™ Device, do not deploy needles. Remove the device over a 0.038" (0.97 mm) (or smaller) guide wire and insert an appropriately sized sheath.
- Prior to depressing the plunger to advance the needles, stabilize the device by the body to ensure the foot is apposed to the vessel wall and the device does not twist during deployment. Twisting (torquing) of the device could lead to needle deflection resulting in a cuff miss. Do not use excessive force or repeatedly depress the plunger. Excessive force on the plunger during deployment could potentially cause breakage of the device, which may necessitate intervention and / or surgical removal of the device and vessel repair.
- Do not apply excessive force to the lever when opening the foot and returning the foot to its original position down to the body of the device. Do not attempt to remove the device without closing the lever. Excessive force on the lever or attempting to remove the device without closing the lever could cause breakage of the device and / or lead to vessel trauma, which may necessitate intervention and / or surgical removal of the device and vessel repair.
- Do not advance or withdraw the Perclose ProGlide™ Device against resistance until the cause of that resistance has been determined. Excessive force used to advance or torque the Perclose ProGlide™ Device should be avoided, as this may lead to significant vessel damage and / or breakage of the device, which may necessitate intervention and / or surgical removal of the device and vessel repair.
- If excessive resistance in advancing the Perclose ProGlide™ Device is encountered, withdraw the device over a 0.038" (0.97 mm) (or smaller) guide wire and reinsert the introducer sheath or use manual compression.
- Remove the Perclose ProGlide™ sheath before tightening the suture. Failure to remove the sheath prior to tightening the suture may result in detachment of the tip of the sheath.
- Care should be taken to avoid damage to the suture from handling. Avoid crushing damage due to application of surgical instruments such as clamps, forceps or needle holders.
- For catheterization procedures using a 5F – 8F procedural sheath, use manual compression in the event that bleeding from the femoral access site persists after the use of the Perclose ProGlide™ SMC System to obtain hemostasis.
- For catheterization procedures using a procedural sheath > 8F, use manual compression, compression assisted devices, surgical repair, and / or other appropriate treatment methods in the event that bleeding from the femoral access site persists after the use of the Perclose ProGlide™ SMC System to obtain hemostasis.
- For catheterization procedures using a procedural sheath > 8F, where the operating physician is not a vascular surgeon, it is recommended that a vascular surgeon or a surgeon with vascular training be available during the procedure to perform any necessary vascular surgical intervention.
- If the Perclose ProGlide™ Device is used to close and repair multiple access sites in the same vessel, space the access sites apart adequately to minimize sheath-device interference
Potential Adverse Events:
Potential adverse events associated with use of vessel closure devices may include, but are not limited to, the following:
- Allergic reaction or hypersensitivity to device components
- Vascular access complications which may require transfusion or vessel repair, including:
- Anemia
- Aneurysm
- Arteriovenous fistula
- Bleeding / hemorrhage / re-bleeding
- Bruising
- Hematoma
- Embolism
- Inflammation
- Intimal tear / dissection
- Perforation
- Pseudoaneurysm
- Retroperitoneal hematoma / bleeding
- Scar formation
- Wound dehiscence
- Cardiac arrhythmias (including conduction disorders, atrial and ventricular arrhythmias)
- Atrial arrhythmias
- Ventricular arrhythmias
- Femoral artery / venous complications which may require additional intervention, including:
- Arterial / venous stenosis
- Arterial / venous occlusion
- Arteriovenous fistula
- Intimal tear / dissection
- Ischemia distal to closure site
- Nerve injury
- Numbness
- Thrombus formation
- Vascular injury
- Venous thromboembolism (including deep vein thrombosis, pulmonary embolism, post-procedure pulmonary embolism)
- Infection – local or systemic
- Pain
- Hemodynamic instability:
- Hypotension / hypertension
- Vasovagal episode
- Death
- Device complications
- Device failure
- Device malfunction
MAT-2100358 v4.0